Set Global Proxy On Arch Linux, with cgproxy, Qv2ray and Trojan-go
Last updated on 2022-10-07, Fri, 04:16 PM
Since 2022-10-05, with libbpf updated from 0.8.1 to 1.0.1, libbpf.so.0.8.1 no longer exists, and cgproxy has therefore lost its important dependency libbpf.so.0 , refusing to run as before.
The upstream is unmaintained from Aug 2020. Before any developer take over, the only effective measure is to add drivers manually.
So, get it from Arch Linux Archive on 2022-10-04.
libbpf 0.8.1 package signature
Unpack the package after PGP verification, move libbpf.so.0.8.1 to /usr/lib/ and add a softlink
sudo ln -s /usr/lib/libbpf.so.0.8.1 /usr/lib/libbpf.so.0This should be enough to keep cgproxy running for a while, however for security reasons it is still recommended to move to another transparent proxy tool as soon as possible, such as v2rayA .
Mellow Made Me Some Trouble
So I want to try proxy at kernel level, in other words, something related to iptables, to replace this troublesome virtual nc manager.
Mellow makes global proxy possible by establishing a virtual network card and corresponding routing rules. But when I switch profiles in it, it might crash and leave all my network card unavailable. It cost me a few days reviewing journalctl and heaps of anger to try everything I could fixing this until I found this article.
Here is its link.
In short, a line of command is needed to fix this.
sudo nmcli n onI really want to get rid of this. It’s not worth using virtual nic when a powerful kernel filter, iptables, is already installed.
But handling iptables itself is very difficult, I tried a few times setting up custom chains and appending that to the main chains. None ever worked.
Install cgproxy and Configure
For Arch users, cgproxy is available on AUR, but paru seemed to refuse making the package, so I had to do this manually.
git clone https://aur.archlinux.org/packages/cgproxy/
cd cgproxy
less PKGBUILD
makepkg -si
Once installation complete, you can start configuring.
sudo vim /etc/cgproxy/config.jsonBy default, it should look like this.
{
    "comment":"For usage, see https://github.com/springzfx/cgproxy",

    "port": 12345,
    "program_noproxy": ["v2ray","qv2ray"],
    "program_proxy": [],
    "cgroup_noproxy": [],
    "cgroup_proxy": ["/"],
    "enable_gateway": false,
    "enable_dns": true,
    "enable_udp": true,
    "enable_tcp": true,
    "enable_ipv4": true,
    "enable_ipv6": true,
    "table": 10007,
    "fwmark": 39283
}
All connections, if not bypassed, will be forwarded to the port set above.
Customize this file as you like.
For detailed explanation, please check this page.
Here I have to emphasize on one thing for the “program” properties:
If your want to exclude programs that are not located in /usr/bin, then you should fill in the full path of them. Otherwise, they will not be exclusively processed.
Remember to add the path of trojan-go to “program_noproxy”.
Install v2ray-core
There are a few methods to introduce v2ray to your machine.
archlinuxcn already has
v2rayin its repository, you can install it very easily.Executable path is
/usr/bin/v2rayand asset folder is/usr/share/v2ray.The developers of
v2ray-coreprovide a shell script to help users install it.Executable path is
/usr/local/bin/v2rayand asset folder is/usr/local/share/v2ray.Install manually. The developers of
v2ray-coreprovide prebuilt binary file too.You can simply download and extract it wherever you like.
Be advised. Method and 3 requires manual updates in the future. Method 1 can follow system update and Method 2 has an automatic update check.
According to the author of cgproxy-1, v2ray TPROXY need root or special permission, use service or
sudo setcap "cap_net_admin,cap_net_bind_service=ep" $V2RAY_PATHReplace $V2RAY_PATH with your paths where v2ray executables are located.
Install trojan-go
I simply downloaded and extracted the binary file. Of course, there are other methods.
wget https://github.com/p4gefau1t/trojan-go/releases/download/v0.10.6/trojan-go-linux-amd64.zip
unzip trojan-go-linux-amd64.zip # -o /usr/local/bin/trojan-go/
Then have my client configuration done. Just set "run_type": "client", that’s already enough.
In order to open it in a different shell terminal, I employed gnome-terminal to do this.
I made two scripts. One to execute trojan-go, the other to start the first script in gnome-terminal.
#!/bin/bash
# 1.sh
sudo $TROJAN_GO_PATH --config $CONFIG_PATH
#!/bin/bash
# 2.sh
gnome-terminal --maximize -- '$PATH_TO_1.sh'I added the parameter --maximize to avoid window misplacing. Otherwise, the title bar will hide into the top bar of my desktop at startup.
And add 2.sh to login scripts so that it will load at startup.
Then simply run it and it will start as expected.
Install Qv2ray and Configure
Qv2ray is available in archlinuxcn and AUR[1] [2]
Usually it’s not bad to install qv2ray-dev-git.
If you have added archlinuxcn to your mirror lists, you can easily install the prebuilt binary package.
sudo pacman -S qv2ray-dev-gitIf have installed AUR helpers like paru, it’s simple too.
paru -S qv2ray-dev-gitOr you can do it manually.
git clone https://aur.archlinux.org/packages/qv2ray-dev-git/
# Or git clone https://aur.archlinux.org/packages/qv2ray/
cd qv2ray-dev-git
# cd qv2ray
less PKGBUILD
makepkg -si
then you can find qv2ray and open it.
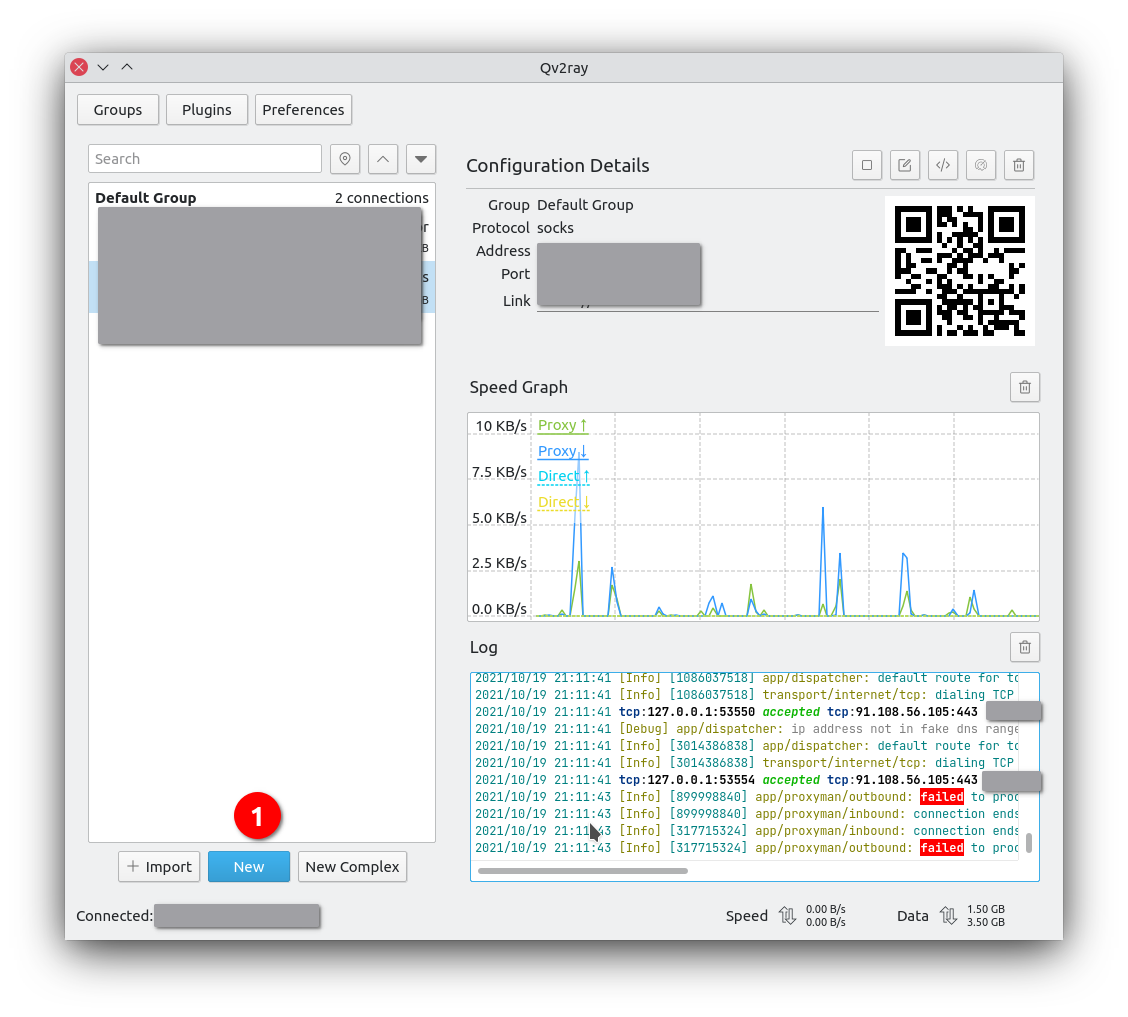
The interface looks like this.
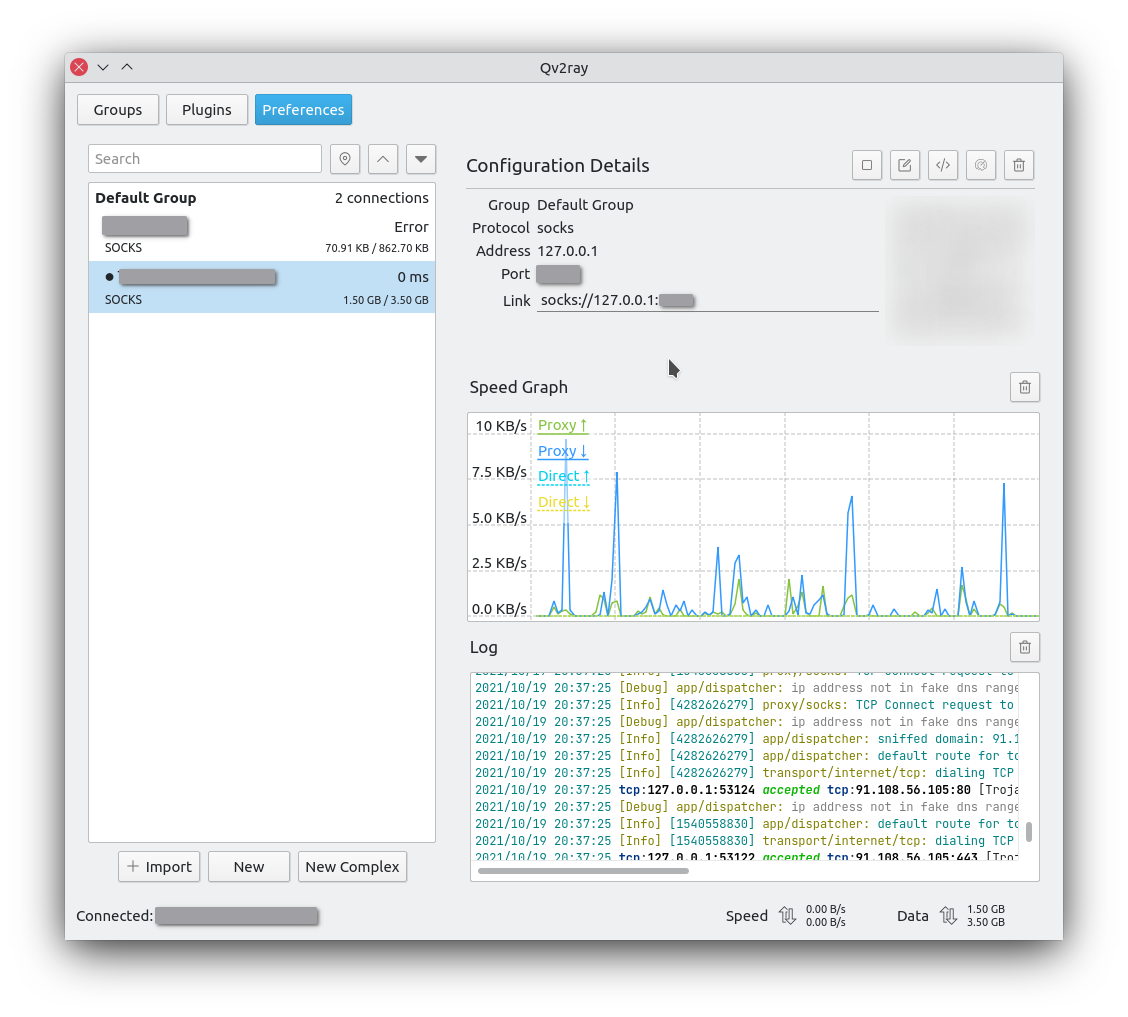
Here qv2ray only serves as a visual interface and secondary router besides iptables and cgproxy.
Go to “Preferences”, then choose “Kernel Settings” and edit “V2Ray Core Settings”, to make qv2ray call on v2ray as expected.
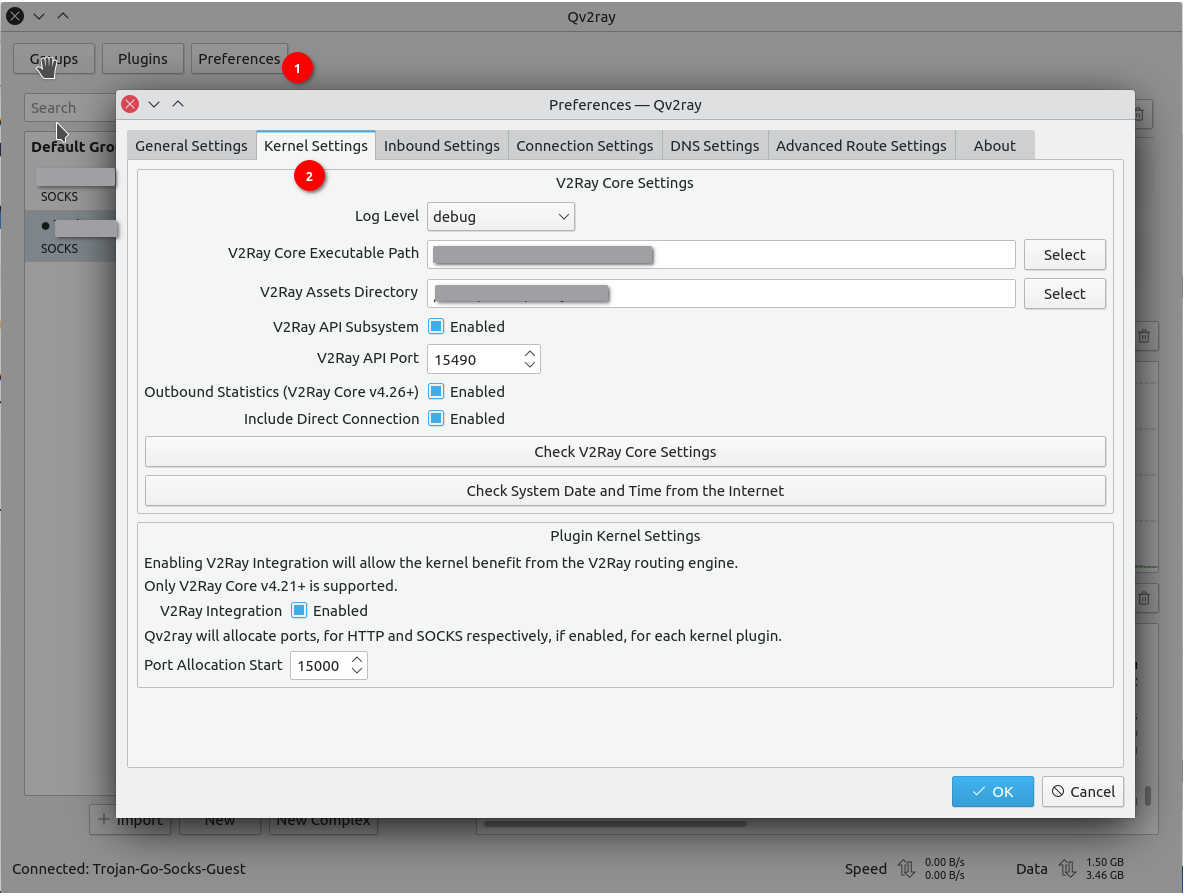
We can enable socks5 and http proxy to save a lot of trouble for cgproxy.
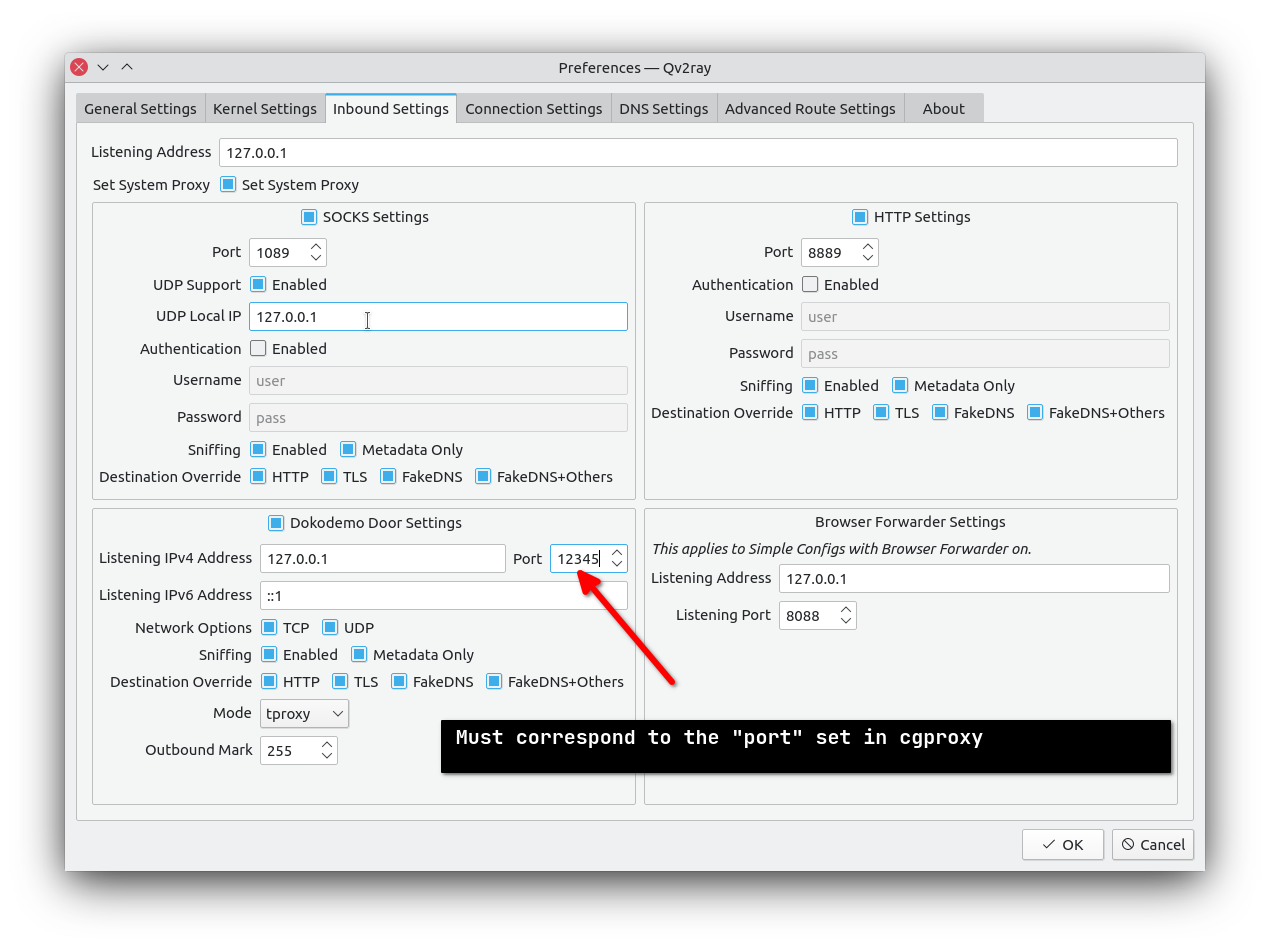
Also, set up the dokodemo-door port correctly.
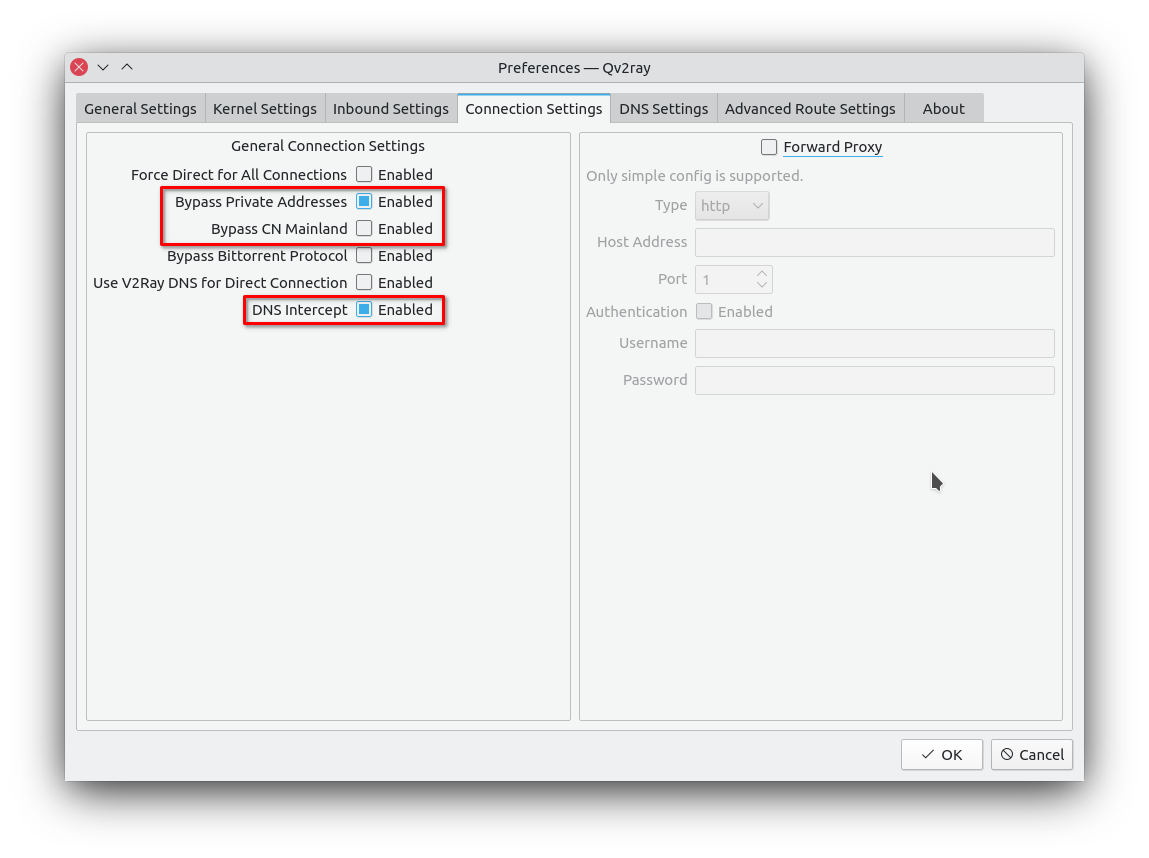
Reconfigure bypass settings like this to establish a good global routing.
Sniffing is not necessary. Same with fakedns.
Intercept DNS so that fakedns will work as expected.
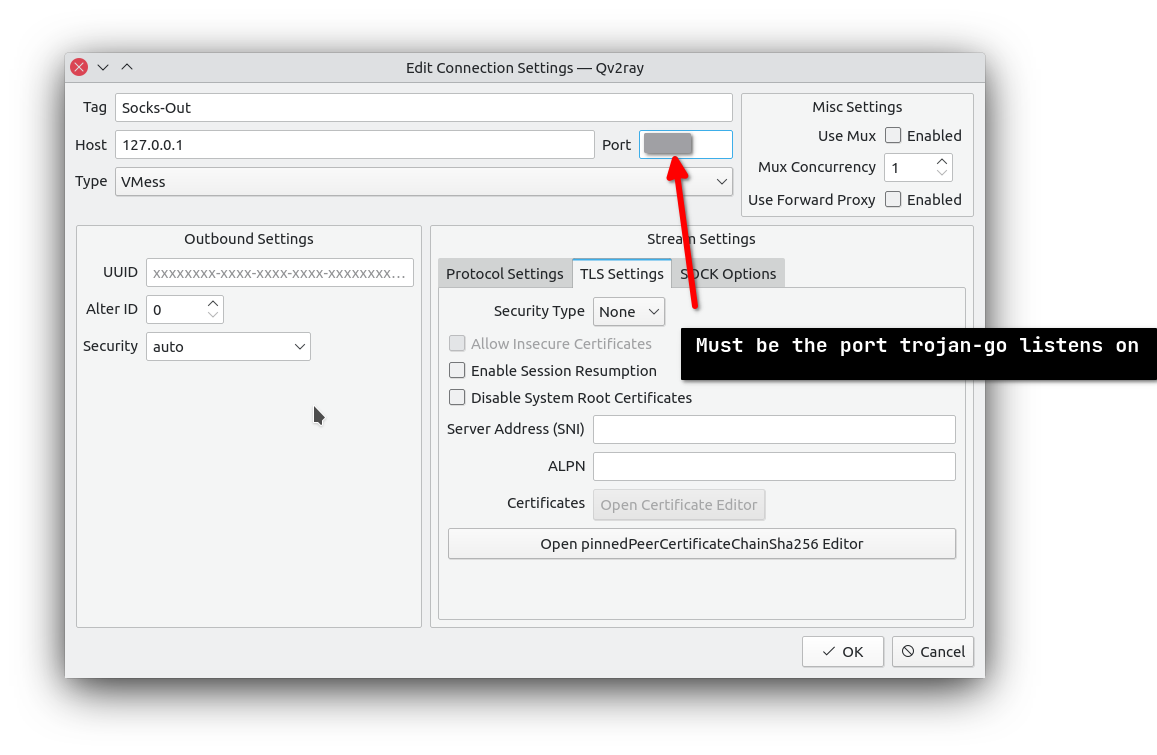
Then add a new connection profile. I want to relay my requests to trojan-go, so I used a socks5 outbound here.
If you want to enable fakedns, you can add a few lines to the connection profile by right clicking on the profile and choosing “edit as JSON”. If you are not familiar with Fake DNS, you can take a look at this article, by the developer of Kitsunebi, and this one by Sukka.
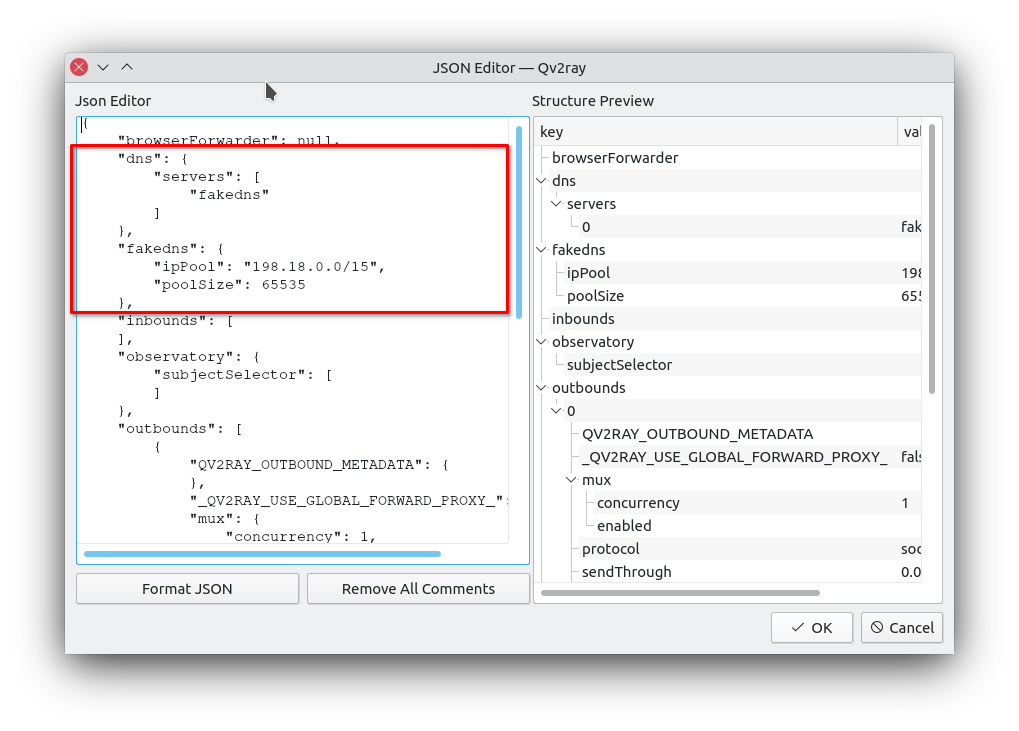
"dns": {
    "servers": [
        "fakedns"
    ]
},
"fakedns": {
    "ipPool": "198.18.0.0/15",
    "poolSize": 65535
},
Then double click or right click on the profile, then the qv2ray client will start running.
Check the paths of "program_noproxy" again, and everything should be running well now.
Drop ICMP
Last but not the least, remember to set a login shell to drop ICMP packs.
#!/bin/bash

sudo iptables -A OUTPUT -p icmp -o $OUT_NC -j REJECT
Replace $OUT_NC with your outbound network card name.
References
-1. https://github.com/springzfx/cgproxy#notes ↩